50 & 20 Years Ago
20 Years Ago: Applied QA in furnace reconstruction project
 From STEEL CONSTRUCTION April 1992
Introduction
A major new blast furnace re-construction project is currently under way at British Steel’s Port Talbot works. The new furnace will substantially improve steel making capacity at the plant. The £71 million project is being co-ordinated by British Steel with shutdown of the existing facilities scheduled for April 1992.
Demolition and reconstruction will then take place over a 153 day period culminating in the commissioning of the new furnace and associated structures and process plant in August 1992.
Rowecord Engineering Limited were awarded the contract to assemble and weld the new furnace shell plates into three separate modules in July 1991.
This article focuses on several key quality assurance aspects of the project and acknowledgement is due to all who contributed valuable time and information.
Project Description
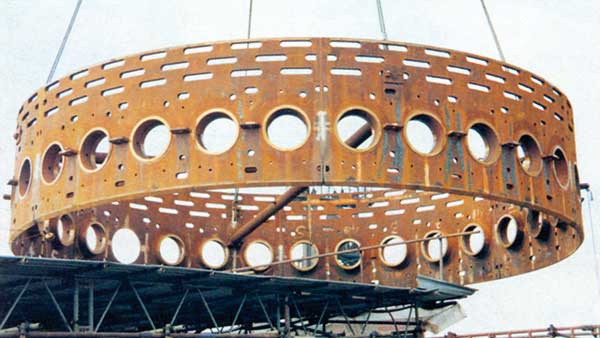
The furnace shell was divided into 14 tiers, Each tier was made up of either six or seven rolled plate segments.
Hot rolled structural steel plate materials to BS EN10025: 1990, mainly grade Fe 510 D1 were supplied cut to size and pre-rolled by British Steel. Plate thicknesses ranged from 25mm to 90mm. Each tier assembly was approximately 3 metres high and weighed from 25 tonnes to 80 tonnes.
Contract Review: Planning and Preparation
Effective lines of communication were established between the Rowecord and British Steel engineering teams. The “fast track” nature of the project and the special site conditions necessitated rapid exchange of information and a fast response to any points of clarification.
Pre-tender planning had obviously defined the project requirements in terms of resources and programme, however it became necessary to prepare more detailed schemes to co-ordinate the activities of British Steel and other contractors involved in the project.
Method statements detailing construction operations and safety procedures were prepared, along with Quality Plans defining the specified requirements in terms of tolerances and weld acceptance levels.
Resources in terms of labour and equipment were reviewed and defined to align with the assembly sequence and with the overall construction programme. Power generation and welding equipment was confirmed and installed. Craneage was ordered and positioned.
 Process Control: Development of Welding Procedures
Development of practical welding procedures became the top priority, the overall success of the project was dependent upon being able to maximise the weld deposition rates and minimise their repair rate, thus maintaining productivity and programme.
Approval testing of welding procedures was carried out in accordance with BS 4870: Part 1 with full ultrasonic testing for volumetric examination and magnetic particle inspection for surface examination. Mechanical tests included tensiles, bends and Charpy impact specimens. British Steel undertook metallographic examination of tested Charpy impact specimens to ascertain notch locations and to assess weld metal and heat affected zone microstructures. Procedure qualification records were prepared and submitted to British Steel for approval.
Process Control: Application of Welding Procedures
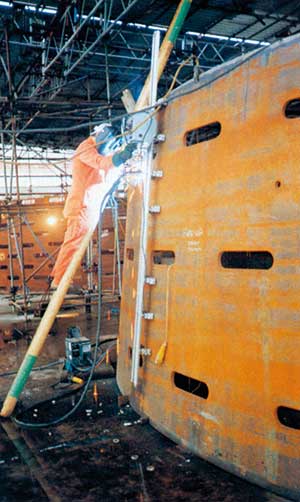
Different solutions were arrived at to weld the horizontal seams and the vertical butts. For the verticals an all positional flux cored wire electrode was chosen.
All vertical weld preparations were of double-vee configuration and required welding on both sides.
Carriages mounted on rigid track, fixed with magnets, parallel to the joint, provided control of travel speed. An oscillating device, mounted on the carriage, held the welding gun in the joint and introduced the option to weave the arc across the weld pool thus ensuring sidewall fusion.
Horizontal seams were welded using a metal-cored wire electrode. Oscillation was unnecessary for welding in the horizontal position thus simplifying the equipment and welding procedure. The carriages were mounted on a flexible track to follow the circumferential joint.
The use of low hydrogen type electrodes and high welding heat inputs reduced the preheat requirements to a minimum. Electrical heating pads were used where preheat was specified. Temperature recorders monitored preheat levels throughout welding operations.
Training
Welding operators were selected from the labour force and allocated to the project. There followed a week’s intensive training and practice supervised by engineers from Rowecord and the equipment suppliers.
Time was also spent in teaching basic maintenance of the equipment. Simple breakdowns and repairs could then be attended to without the need for off-site expertise.
Inspection and Testing: Dimensional Control
The specification laid down stringent dimensional tolerances on circumference, diameter, concentricity and height, therefore comprehensive surveys were undertaken at all stages of manufacture and construction.
After delivery the assembled tiers were re-surveyed. Allowances for welding shrinkage and corrections for tier to tier variations were made as the project progressed. Regular in-process checks were made to monitor welding distortion and to recommend changes to welding sequences to compensate.
Record of the dimensional accuracy of each module was compiled as the project progressed.
Inspection and Testing: Welding Inspection
All completed welds were 100% visually examined prior to final inspection. Final non-destructive testing involved percentage checking with particular emphasis being placed on critical areas such as adjacent to cut-outs and cooler slots in the shell wall, and the junctions of vertical and horizontal welds. Ultrasonic testing was carried out for surface examination. Testing rates were varied according to the level and type of defects discovered. Repair rates were extremely low and were generally associated with areas completed with manual welding. N.D.T. reports were compiled into full documentary records to complete a welding history of the major joints on the project.
Conclusion
The overall success of the project was achieved by application of quality assurance in activities such as forward planning, developing and control of the welding process, training and quality control operations such as dimensional surveying and non-destructive testing.
In parallel with the furnace shell assembly and welding project Rowecord Engineering Limited have been awarded several other module construction contracts involving fabrication and erection of foundation brackets, underneath cooling structures, tower structures, bustle main pipework and hot blast systems.


